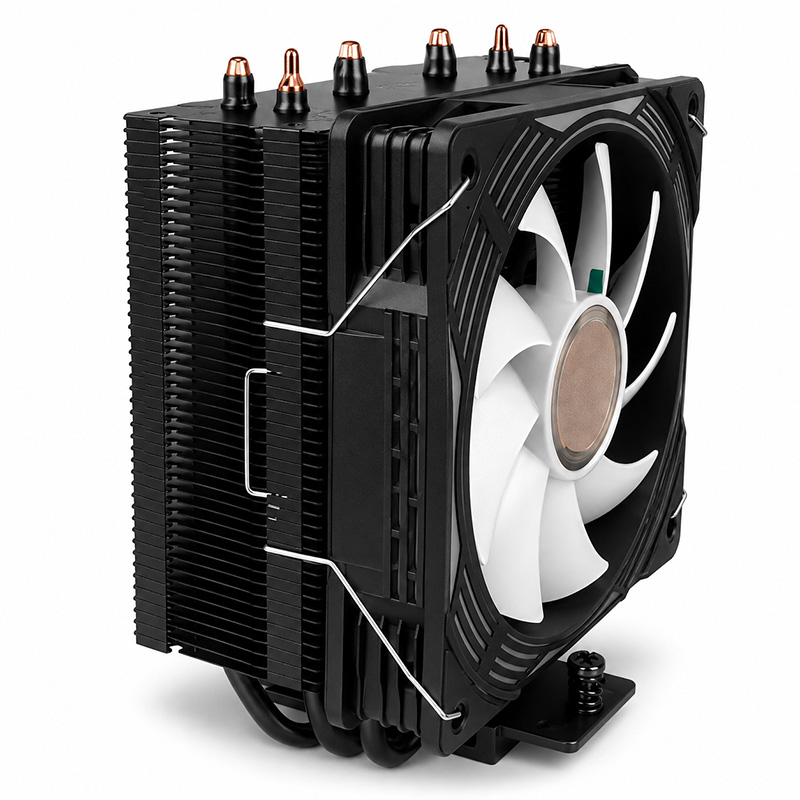

# Step-by-Step Installation Guide for the ATX Cooler 104-0050-2
The ATX Cooler 104-0050-2 is a high-performance cooling solution designed to enhance the thermal management of your computer systems. Whether you are building a new PC or upgrading an existing setup, proper installation of this cooler is crucial to ensure optimal performance and longevity of your hardware components. This comprehensive guide will walk you through the installation process step-by-step, providing professional insights and best practices to help you achieve a clean and efficient setup.
---
## Table of Contents
1. Introduction to the ATX Cooler 104-0050-2
2. Pre-Installation Preparation
3. Tools and Materials Required
4. Step 1: Power Down and Unplug Your System
5. Step 2: Remove Existing Cooling Components
6. Step 3: Prepare the Motherboard and CPU Socket
7. Step 4: Installing the Mounting Bracket
8. Step 5: Apply Thermal Paste Correctly
9. Step 6: Secure the ATX Cooler 104-0050-2
10. Step 7: Connect the Cooler Fan(s)
11. Step 8: Cable Management and Final Checks
12. Testing and Monitoring Post-Installation
13. Troubleshooting Common Issues
14. Conclusion
---
## 1. Introduction to the ATX Cooler 104-0050-2
The ATX Cooler 104-0050-2 is engineered with advanced heat dissipation technologies, including high-quality heat pipes and optimized fan design. Its compatibility with a wide range of ATX motherboards makes it an ideal choice for both gamers and professionals looking to maintain stable system temperatures under heavy workloads.
---
## 2. Pre-Installation Preparation
Before beginning the installation, ensure you have a clean, static-free workspace with ample lighting. Familiarize yourself with your PC case’s layout, motherboard specifications, and clearance measurements to verify that the ATX Cooler 104-0050-2 fits properly without interference.
### Environmental Settings:
- Set your workspace background color to a calming tone (e.g., #f4f8ff) to reduce eye strain.
- Maintain clear margins around your workspace to avoid clutter.
- Ensure proper padding on surfaces to prevent damage to components.
---
## 3. Tools and Materials Required
- Phillips-head screwdriver
- Isopropyl alcohol (70% or higher)
- Lint-free cloth or coffee filters for cleaning
- Thermal paste (if not pre-applied)
- Anti-static wrist strap (recommended)
- ATX Cooler 104-0050-2 mounting hardware and manual
---
## 4. Step 1: Power Down and Unplug Your System
Safety is paramount. Power off your computer completely and unplug it from the power outlet. Press the power button for a few seconds to discharge any residual electricity. This reset step ensures no current flows during the installation, protecting both you and your hardware.
---
## 5. Step 2: Remove Existing Cooling Components
Remove your old CPU cooler carefully by unscrewing the mounting brackets or clips. Disconnect its fan cable from the motherboard header. If your previous cooler used thermal paste, clean the surface thoroughly before proceeding.
---
## 6. Step 3: Prepare the Motherboard and CPU Socket
Use isopropyl alcohol and a lint-free cloth to clean the surface of the CPU and surrounding area. Make sure the area is free from dust, old thermal paste, and other contaminants. This preparation ensures maximum contact between the CPU and the new cooler.
---
## 7. Step 4: Installing the Mounting Bracket
The ATX Cooler 104-0050-2 comes with a universal mounting bracket compatible with various sockets. Follow these steps:
- Identify your CPU socket type (Intel or AMD) and select the corresponding bracket components.
- Attach the backplate to the rear side of the motherboard if required.
- Secure the mounting bracket on the front side using the supplied screws.
- Ensure the bracket is centered and tightened evenly to avoid uneven pressure.
Pay close attention to the **box-sizing** of the mounting hardware to make sure the cooler sits flush against the CPU.
---
## 8. Step 5: Apply Thermal Paste Correctly
Thermal paste facilitates heat transfer between the CPU and the cooler base. Apply a small pea-sized amount at the center of the CPU heat spreader. Avoid over-application to prevent spillage onto the motherboard.
Key points:
- Use a consistent font-family style when labeling your thermal paste tube for easy identification.
- Maintain minimal padding when applying the paste to avoid excess.
- The goal is a thin, even layer after installing the cooler.
---
## 9. Step 6: Secure the ATX Cooler 104-0050-2
Position the cooler over the mounting bracket aligning the screw holes precisely. Screw in the cooler gradually in a cross pattern to distribute pressure evenly.
- Confirm the cooler’s **margin** does not interfere with RAM slots or PCIe cards.
- Adjust any fan orientation as needed to optimize airflow within the case.
- The cooler’s height should fit within the case without forcing the side panel.
---
## 10. Step 7: Connect the Cooler Fan(s)
Connect the ATX Cooler 104-0050-2 fan cable to the CPU_FAN header on your motherboard.
- Verify **font smoothing** and **text rendering** settings in your BIOS or system monitor software to display accurate temperature readings.
- If your cooler has multiple fans, connect them in series or via a fan hub as per manufacturer instructions.
- Ensure cables are not taut to prevent disconnections during movement.
---
## 11. Step 8: Cable Management and Final Checks
Use cable ties to neatly route and secure fan cables away from moving parts. Maintain a clean **page wrapper** inside your case to promote efficient airflow and avoid overheating.
Final checks:
- Confirm all screws are tightened but not over-torqued.
- Check for any gaps between the cooler base and CPU.
- Look for any visible signs of damage or misalignment.
- Verify your case’s **overflow-x hidden** setting by ensuring no cables protrude beyond designated areas.
---
## 12. Testing and Monitoring Post-Installation
Power on your system and enter the BIOS or use software tools to monitor CPU temperatures and fan speeds.
- The **container max-width** for thermal monitoring windows should be 1180px or adjusted for your display to ensure readability.
- Observe the **hero background** color (#eaf2ff) styled interface of monitoring apps to reduce eye fatigue.
- Listen for unusual noises indicating fan issues.
- Run stress tests to confirm cooling stability.
---
## 13. Troubleshooting Common Issues
**High Temperatures:**
- Re-check thermal paste application and cooler seating.
- Inspect fan connections and orientation.
**Fan Not Spinning:**
- Verify power connectors.
- Test fan independently with a 12V source.
**Interference with Other Components:**
- Adjust cooler positioning or consider low-profile RAM modules.
---
## 14. Conclusion
Installing the ATX Cooler 104-0050-2 correctly is essential for maintaining your system’s performance and reliability. This step-by-step guide has covered the key phases—from preparation and mounting to testing and troubleshooting—ensuring you can confidently handle the installation process. By paying attention to detail, such as even pressure application, proper thermal paste use, and neat cable management, you optimize your PC’s thermal efficiency and prolong the lifespan of its components.
Remember to always consult the official manual included with your ATX Cooler 104-0050-2 for any model-specific instructions or updates. With careful installation and regular maintenance, your ATX Cooler will provide excellent service for years to come.
---
**Keywords:** reset, margin, padding, box-sizing, font-family, page wrapper, background color (#f4f8ff), text color (#111), overflow-x hidden, font smoothing (webkit-font-smoothing), text rendering (optimizeLegibility), section padding, container max-width (1180px), container margin auto, hero background (#eaf2ff), hero border-bottom (#dbe7ff), hero-box f