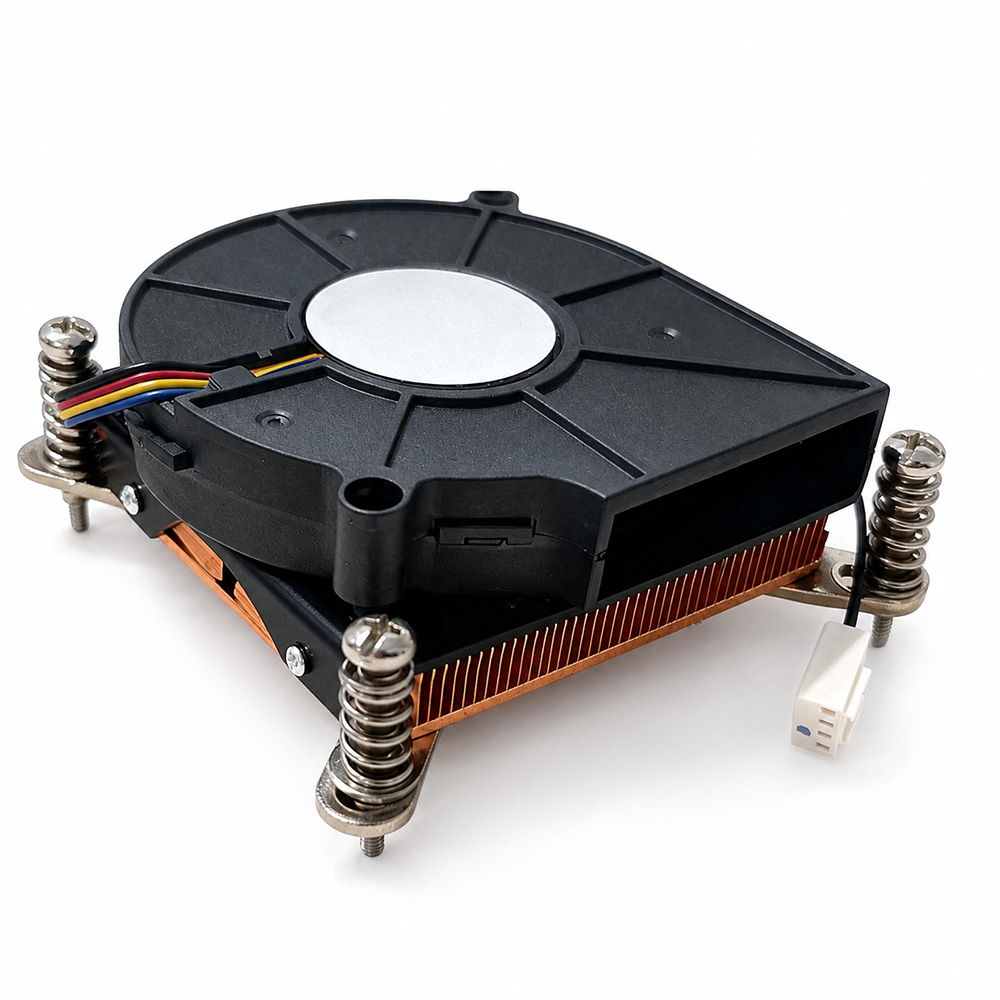

# Installation Guide: How to Properly Install the Server Heatsink 1U Heat Sink 103-0011-1
In today’s data-driven world, servers are the backbone of IT infrastructure, and their reliability directly impacts business continuity. One crucial component ensuring server stability is efficient thermal management, particularly through the use of heatsinks. The **1U Heat Sink 103-0011-1** is a high-performance cooling solution designed for compact server environments, especially 1U rack-mounted servers where space constraints are significant.
This comprehensive installation guide will walk you through the precise steps to properly install the Server Heatsink 1U Heat Sink 103-0011-1, ensuring optimal thermal performance and system longevity. Whether you are a seasoned IT professional or a system integrator, following this protocol will help avoid common pitfalls like improper mounting, thermal paste mishandling, or physical damage.
---
## Understanding the Importance of Proper Heatsink Installation
Before diving into the installation process, it is essential to understand why proper heatsink installation matters:
- **Thermal Efficiency:** A correctly installed heatsink ensures maximum heat transfer from the CPU to the cooling fins, preventing overheating.
- **System Stability:** Overheated CPUs can lead to throttling, crashes, or permanent hardware damage.
- **Longevity:** Consistent thermal regulation prolongs the life span of your server's critical components.
- **Noise Reduction:** Efficient heat dissipation reduces fan speeds, resulting in quieter operation.
The 1U Heat Sink 103-0011-1 is engineered for low-profile chassis, optimizing airflow within dense server racks. It features a robust baseplate, fine aluminum fins, and an integrated fan interface compatible with most server motherboards.
---
## Pre-Installation Preparations
### Tools and Materials Required:
- Anti-static wrist strap
- Thermal paste (high-quality, non-electrically conductive)
- Lint-free cloth or isopropyl alcohol wipes
- Phillips screwdriver (appropriate size)
- The 1U Heat Sink 103-0011-1 unit
- Server motherboard manual (for reference)
### Safety and Environment Considerations:
- Always power down the server and unplug it from the mains before starting.
- Use an anti-static wrist strap to avoid damaging sensitive components.
- Work in a clean, dust-free environment.
- Ensure proper lighting and workspace organization to prevent accidental drops or misplaced screws.
---
## Step-by-Step Installation Procedure
### 1. Prepare the Server for Installation
Start by resetting the server environment to minimize static buildup. Place the server on a flat surface and open the chassis according to the manufacturer’s guidelines. Remove any existing heatsink carefully by loosening retention screws or clips.
Use a lint-free cloth soaked with isopropyl alcohol to clean the CPU surface thoroughly. Remove all remnants of old thermal paste to ensure a smooth, clean interface for the new heatsink.
### 2. Inspect the 1U Heat Sink 103-0011-1
Before installation, conduct a thorough inspection of the heatsink:
- Check for any physical damage such as bent fins or loose components.
- Confirm that the mounting mechanism (clips, screws, or brackets) is intact.
- Verify that the heatsink base is flat and free of debris.
### 3. Apply Thermal Paste Correctly
Apply a small pea-sized amount of thermal paste to the center of the CPU surface. Avoid excessive amounts, which can cause spillage onto the motherboard and degrade performance. The goal is to create a thin, even layer after pressure is applied by the heatsink.
### 4. Position the Heatsink
Align the heatsink over the CPU socket carefully, matching the mounting holes or clip positions exactly. For the 1U Heat Sink 103-0011-1, ensure its low profile aligns with adjacent components to avoid interference.
Maintain the following layout considerations while positioning:
- The heatsink should be centered to cover the entire CPU die surface.
- The orientation should facilitate optimal airflow in coordination with server fans.
- Avoid touching the bottom surface to maintain thermal paste integrity.
### 5. Secure the Heatsink
Once aligned, gently press the heatsink down to spread the thermal paste evenly.
- Use the provided screws or clips to fasten the heatsink firmly.
- Follow a diagonal tightening sequence to ensure even pressure distribution.
- Avoid overtightening, which may damage the CPU or motherboard.
### 6. Connect the Cooling Fan (if applicable)
If the heatsink includes an integrated fan, connect the fan cable to the appropriate motherboard header, typically labeled CPU_FAN.
Ensure the cable routing does not obstruct other components or airflow paths.
### 7. Reassemble the Server
Replace the chassis cover securely, reconnect all cables, and place the server back in its rack or designated location.
---
## Post-Installation Checks
### Visual Inspection
- Confirm that the heatsink is snugly fitted without any gaps.
- Ensure fan cables are secured and do not interfere with other components.
### BIOS/UEFI Verification
- Power on the server and enter BIOS/UEFI settings.
- Monitor CPU temperature readings and fan speeds.
- Verify that the heatsink fan is detected and operating normally.
### Stress Testing
Run a CPU stress test or benchmarking tool to observe thermal performance under load. Temperatures should remain within manufacturer specifications (often below 80°C for typical server CPUs).
---
## Common Mistakes to Avoid
- **Skipping Thermal Paste Application:** This is critical for heat transfer; never install a heatsink dry.
- **Using Excessive Thermal Paste:** Can cause short circuits or reduced efficiency.
- **Poor Alignment:** Leads to uneven pressure and inadequate cooling.
- **Overtightening Screws:** Risks motherboard or CPU damage.
- **Ignoring Fan Connection:** Results in no active cooling and potential system shutdown.
---
## Additional Tips for Optimal Installation
- **Reset Your Workspace’s CSS-Like Approach:** Just like CSS resets margin, padding, and box-sizing to prevent styling conflicts, always clear the workspace of clutter and static buildup before installation.
- **Keep a Clean Page Wrapper Environment:** Maintain a clean server chassis interior with minimal dust and proper background color ambiance (#f4f8ff) helps visual clarity during installation.
- **Font Smoothing and Text Rendering Analogy:** Just as font smoothing and text rendering optimize readability, paying attention to detail enhances installation precision.
- **Section Padding and Container Max-Width:** Think of the server rack as a container with a max width (~1180px equivalent), and ensure adequate padding (airflow clearance) around components.
- **Hero Background and Border-Bottom Parallel:** Similar to defining a “hero” section in web design with distinct background (#eaf2ff) and border-bottom (#dbe7ff), define clear zones in your rack for airflow and cabling.
---
## Conclusion
Proper installation of the **Server Heatsink 1U Heat Sink 103-0011-1** is a critical step in maintaining your server’s performance, reliability, and longevity. By carefully preparing the system, applying thermal paste correctly, ensuring accurate alignment, and securing the heatsink with appropriate force, you optimize heat dissipation and protect your investment.
Remember, attentive execution akin to a developer’s meticulous CSS handling—addressing reset, margin, padding, and box-sizing—is key to achieving seamless integration between hardware and cooling components.
Following this detailed installation guide will enable IT professionals to confidently install the 1U Heat Sink 103-0011-1, minimizing downtime and maximizing server uptime.
---
### References
- Manufacturer’s installation manual for 1U Heat Sink 103-0011-1
- Industry best practices for server cooling solutions
- Thermal paste application techniques from leading hardware forums
---
*For further inquiries or technical support, please contact your server hardware provider or consult professional IT technicians.*