
# Step-by-Step Installation Guide for the Server Heatsink 2U Model 104-0046-1
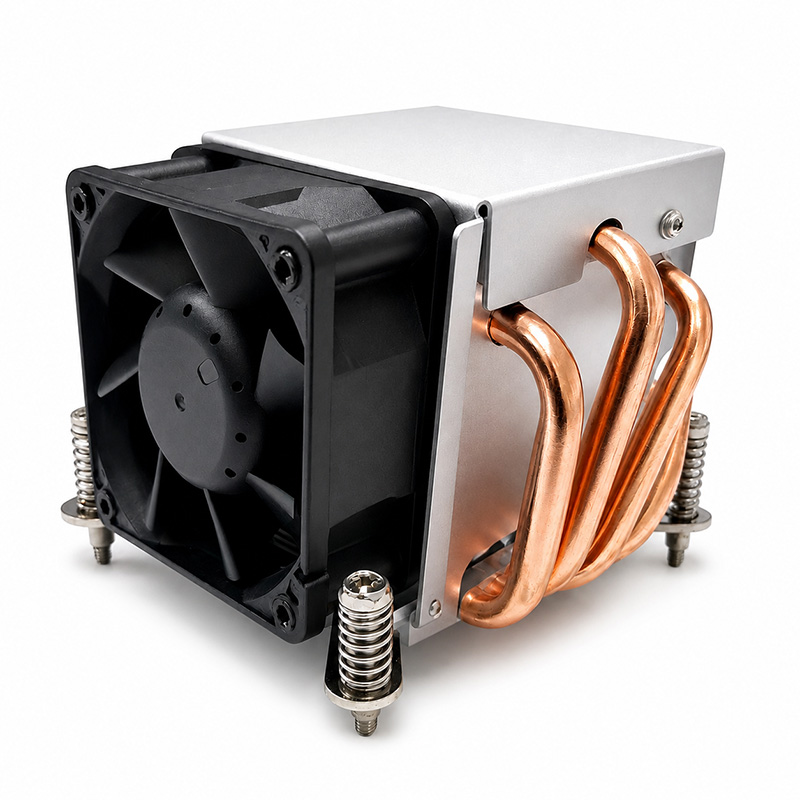
In today’s data-driven world, maintaining optimal server performance is pivotal to the stability and efficiency of IT infrastructure. One critical component in server maintenance is the heatsink, which plays a vital role in thermal management by dissipating heat generated by the processor. The **Server Heatsink 2U Model 104-0046-1** is specifically designed for mid-to-high density rack servers, offering efficient cooling in a compact form factor.
This comprehensive guide will walk you through the step-by-step installation process of the Server Heatsink 2U Model 104-0046-1. Whether you are a seasoned IT professional or a system integrator installing new hardware, this tutorial aims to ensure a smooth and secure installation, preventing overheating and prolonging the life of your server components.
---
## Table of Contents
1. Introduction to the Server Heatsink 2U Model 104-0046-1
2. Tools and Preparation
3. Safety Precautions
4. Installation Step-by-Step
- Resetting the Server Environment
- Removing Existing Cooling Components
- Preparing the CPU Socket
- Installing the Heatsink
- Securing the Heatsink
- Connecting Fan Power
5. Post-Installation Checks
6. Troubleshooting Tips
7. Conclusion
---
## 1. Introduction to the Server Heatsink 2U Model 104-0046-1
The Model 104-0046-1 is engineered to fit within a 2U server chassis, providing superior heat dissipation with minimal footprint. Its design integrates advanced thermal materials, optimized fin arrays, and efficient airflow channels to maintain a stable processor temperature even under heavy workloads.
### Key Features:
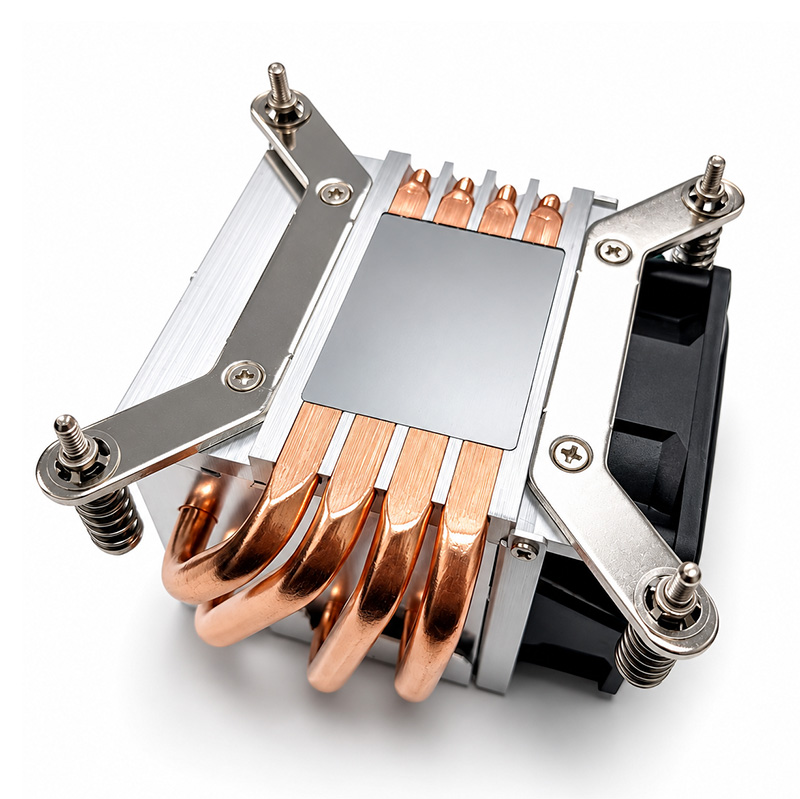
- High-performance copper base plate with anodized aluminum fins
- Integrated fan with PWM speed control
- Compatibility with common server CPUs in 2U chassis
- Easy mounting mechanism compatible with standard retention brackets
---
## 2. Tools and Preparation
Before starting the installation, gather the necessary tools and prepare your workspace:
- Anti-static wrist strap
- Phillips-head screwdriver (magnetic tip recommended)
- Thermal paste (high-quality, non-conductive)
- Lint-free cloth and isopropyl alcohol (for cleaning)
- User manual for specific server model (for reference)
Ensure that your workspace is clean and free from static electricity to prevent damage to delicate components.
---
## 3. Safety Precautions
Working inside servers involves handling sensitive electronic parts. Adhere to the following safety guidelines:
- Power down the server completely and disconnect it from the power source.
- Ground yourself using an anti-static wrist strap connected to a grounded surface.
- Avoid touching the CPU pins or socket contacts.
- Handle the heatsink carefully to avoid bending fins or damaging the fan assembly.
---
## 4. Installation Step-by-Step
### Resetting the Server Environment
Before removing or installing any hardware, it is advisable to reset the server environment to avoid residual electrical charge that could harm components.
- Press and hold the power button for 10-15 seconds after unplugging the server to discharge capacitors.
- Wait for 5 minutes before beginning work inside the chassis.
### Removing Existing Cooling Components
If you are replacing an old heatsink:
- Open the server chassis by loosening the screws or latches securing the cover.
- Identify the existing heatsink attached to the CPU socket.
- Disconnect the fan power cable carefully from the motherboard header.
- Unscrew or unclip the heatsink according to your server's retention mechanism.
- Gently twist and lift the heatsink off the CPU. If it resists, apply slight rotational force; do not use excessive force.
- Clean off old thermal paste residue on the CPU surface and heatsink contact plate using a lint-free cloth and isopropyl alcohol. Allow to dry completely.
### Preparing the CPU Socket
- Inspect the CPU socket and surrounding area for dust or debris; clean if necessary.
- Ensure the CPU is properly seated and locked into the socket.
- Apply a small pea-sized amount of fresh thermal paste at the center of the CPU heat spreader. This ensures optimal thermal conductivity between the processor and heatsink.
### Installing the Heatsink
- Position the Server Heatsink 2U Model 104-0046-1 over the CPU, aligning it with the mounting holes or retention clips.
- Lower the heatsink gently, ensuring the thermal paste spreads evenly without spilling.
### Securing the Heatsink
- Use the provided screws or retention mechanisms to fasten the heatsink firmly to the motherboard. Tighten screws in a crisscross pattern to distribute pressure evenly.
- Avoid overtightening to prevent damage to the CPU or motherboard.
### Connecting Fan Power
- Plug the heatsink fan connector into the appropriate CPU fan header on the motherboard.
- Confirm the connection is secure but avoid forcing the connector into incompatible headers.
---
## 5. Post-Installation Checks
After completing the physical installation:
- Replace the server chassis cover and secure it.
- Reconnect the power supply and peripherals.
- Power on the server and enter the BIOS/UEFI firmware interface to monitor CPU temperature and fan speed.
- Verify that the fan is operating correctly and that temperatures remain within manufacturer-specified limits under idle conditions.
- Optionally, run a hardware diagnostic or stress test to confirm stable thermal performance.
---
## 6. Troubleshooting Tips
- **Fan not spinning:** Recheck the fan power connection and ensure the motherboard fan header is functional.
- **High CPU temperatures:** Confirm thermal paste application and heatsink seating. Verify airflow inside the chassis is unobstructed.
- **Unusual noises:** Inspect the fan for debris or mechanical issues; replace if necessary.
- **System instability or shutdowns:** Overheating can cause thermal throttling or shutdown; verify heatsink installation and cooling efficiency.
---
## 7. Conclusion
Installing the Server Heatsink 2U Model 104-0046-1 is a straightforward process when approached methodically and with attention to detail. Proper thermal management is essential for maintaining server reliability, performance, and longevity. By following this step-by-step guide, you minimize risks related to overheating and hardware failure, ensuring your server operates smoothly under demanding workloads.
Always consult your server’s documentation for model-specific instructions and adapt this guide accordingly. For best results, pair this heatsink with proper chassis airflow management and regular maintenance schedules.
---
### Additional Notes on Styling for Documentation (CSS Keywords Context)
While this article focuses on the technical procedure, if you plan to document this guide on a webpage or internal wiki, consider the following styling elements inspired by the extracted CSS keywords for readability and user experience:
- Use a **page wrapper** with defined `max-width` and `margin: auto` to center content and improve legibility.
- Apply a consistent `font-family` across all text sections, favoring clean sans-serif fonts for clarity.
- Implement `padding` on sections and containers to prevent text crowding and enhance white space.
- Choose a subtle `background-color` with appropriate `text-color` contrast to reduce eye strain.
- Utilize `box-sizing: border-box` to simplify responsive layout management.
- Employ `flex display` and `flex-wrap` in hero sections or headings to organize titles and images effectively.
- Optimize `font smoothing` and `text rendering` properties for crisp typography across devices.
By integrating these design principles, your server installation documentation will not only be informative but also visually accessible and engaging.
---
*For more technical guides and support, visit our [Support Center](#) or contact your hardware provider.*